Tuesday, October 30, 2012

Box of Sunshine

It has already been an incredibly busy week at work.  I have taken a new position that I start in a couple of weeks and I have been frantically trying to get things in order before I go.

It is a bittersweet departure as I work with some really great people!  One of them was pretty down today (for a very legitimate reason which I won't go into).  I think the world of this gal and wanted to do something to cheer her up.  What could be better on a cloudy day than a box of sunshine?


 Here is my finished box:


Now, I already had this great container that a friend gave me a while back.  It actually came with a lid, but in this case, I can't use it.

So, I started with my container and the top of my paper shredder.  You know the pesky ends of shipping paper rolls?  That piece that is too short to wrap a box with but just big enough that the Hoarder in you doesn't want to throw it out? Cut those into strips the width of your shredder and let them fall straight in your container like so:


Next, I took some tissue paper, cut it into strips and ran those through the shredder.


Fill the box with your sunshine.  I chose a lot of lemon flavor items.  My friend has a little girl that is young, so I figured she could use some of the items in the box :).

I will probably add some paper flowers as filler.  You could also use a hat box for this and prop the lid up behind the back and shrink wrap it.  I can think of a ton of ideas!  If you make one send a photo my way!


Sunday, October 28, 2012

Boo Bags!

Well, it's been another weekend of a head full of craft projects and not enough time to do them all!

I had to get some treats ready for my littlest guys school party on Halloween by tomorrow, so my other projects had to take a back seat for a while today.

Now, I have always said that when your financially challenged, you have to be creative.  I think some of my creativity comes out of necessity, really.  

I was looking for a project that I could give one of to 20+ kids in the classroom for under $10.  A tall order, I know, but I managed to pull it off!

These little "Boo Bags" fit the bill perfectly!


To make these, you will need:

  • 3 bags of Cheeto's Puffcorn (or less, depending on how many you are making).
  • Cheap (and I mean any bag will do) Ziploc bags.
  • Printer Paper
  • Black construction paper
  • Stapler
  • Sharpie
  • Glue
I got about 6 Boo Bags per Puffcorn bag.  I also did some microwave popcorn mummies, so the 18 Boo Bags plus my popcorn mummies will take care of everyone in the class. :)

1) Fill each Ziploc bag with Puffcorn a little more than half way.

2)  Cut strips of construction paper the width of your Ziploc bag and about 4-5 inches tall.  Fold each strip in half, position it over the top of the bag (to hide the zip strip) and staple it down on each side.

3)  Make some ovals on your computer that are about 1 1/2" tall.  Print them off and cut them out.

4)  Glue two eyes on each bag.

5)  Use Sharpie Marker to draw a black dot on each eye.

This craft couldn't be simpler, was fast and cheap and I think the kiddos will get a little kick out of them.

Now....off to make my little guy's costume out of a pack of construction paper and an empty cardboard box!


Saturday, October 27, 2012

Mug Rug!

Today I was inspired to make my first Mug Rug after seeing one on Craftsy.  The one on Craftsy was a fall one with a couple of pumpkins.  It was cute, but I wanted to try for one that was not seasonal and I could use anytime at my desk at work or in my sewing room.

I also think that small projects like this give you an opportunity to experiment and practice your fundamentals.  


My experiment on this little project was putting a roughly 1/8" seam around the edge before binding it.  I have been wondering for some time now if that would make the binding easier to fold over when doing my hand stitching on the back.  I think that it did make a difference on this project and I will probably use the technique again in the future.

I actually think you could get away with not binding this and just doing a 1/4 inch seam around the edge.  However, lately I have been on a big "frame everything in white" kick, and this project was no different!

Here is a shot of my finished project.  Start to finish...maybe a 45 minute project.  This (to me) makes it perfect for gift giving!  I am itching to try a square one with an applique monogram......I feel another project coming on!


Sunday, October 21, 2012

Circle Quilt Part 2

Today I got through enough steps on the quilt to do Part 2 of this tutorial.  Now that you have your circles made, you are ready for your next step.

Arrange all of your circles on your backing fabric.  I used a roughly 42" X 42" piece of muslin.  I really contemplated putting these on a white background (which would have looked great), but I have always wanted to do a top with muslin.  I had this muslin lying around that someone had given me and I used a little more than a half of a charm pack on this quilt, so for the roughly $3.50 I have in this top....I figured I could chance it with the muslin.

After you have your circles arranged the way you like, pin each one down.  I just used a single quilting pin in each circle.


Next, following the package directions on your fusible stabilizer, iron each circle down.  

Now, using a narrow zig-zag stitch.  Sew each circle down to your backing fabric.


Here is a finished circle.  They are actually quite flat once they are sewn down.


And, here is a shot of some of them tacked down and some not sewn down yet.  


 I have not quite made a decision on how I am going to quilt mine just yet! 


Saturday, October 20, 2012

Circle Quilt

Well, this weekend I have a LOT of projects going in the sewing room.  I just finished cutting a quilt kit for my mother, who is making a quilt for the newest addition to the family....a new grand daughter.  This marks the first grand daughter in the family :).

I have another "Basket Weave" quilt in the works as well.  This one I am calling "A Walk in the Woods".  I will show that one later when it's a little more presentable.

So, in the midst of these projects I decided to try out a circle quilt that I have really, really been wanting to do.  I am calling this "Part 1" of the tutorial on how to make it.

This would be the absolute perfect quilt to make if you only had two or three days to put something hand made together for a baby shower!  It is simple and easy.  I am a firm believer that a quilt doesn't have to be complex or difficult to be beautiful and I love the modern cute look of the fabrics in this one.

Here are some of my circles:


Start by selecting a circle template in whatever size you want.  I started with charm squares for my fabric so I used a CD which was the PERFECT size.  For my quilt, I am using 25 circles.  Use your circle template and cut out as many circles as you like.  

Next, cut the same amount of circles out of a lightweight fusible stabilizer with the same circle template.  I just picked up some at Jo Ann Fabric.


Now, take a circle of fabric and a circle of stabilizer and put them right side of fabric and fusible side of stabilizer together.


Now sew your circle completely closed all the way around.  Sew as close to the edge you can while still making sure to get both the stabilizer and fabric.


If you are wondering why you don't leave an opening....here is the answer. 


 Pull the fabric and the stabilizer apart from one another and cut a small to medium sized slit in the stabilizer.  Be careful not to cut your fabric!  Turn your circle inside out.  Trust me, it won't matter that the stabilizer has a cut in it later in the process.


Next, use a pencil or sewing marker and gently shape your seam to flatten out your circle.  Be careful not to push too hard!


Now you have a finished circle! 


Now, fashion as many as you like and come back in a few days for the next segment of this tutorial!


Monday, October 15, 2012

Flower Basket Quilt Pattern

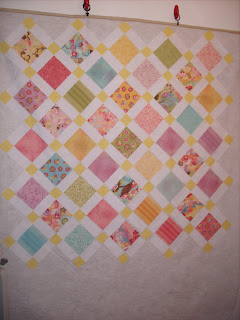
Well, my flower basket quilt is finished (except for binding).  I promised a pattern and here it is.  Now, bear with me here.....I have never written a pattern before.  Come to think of it, I have only ever followed one or two quilt patterns.  I have made one particular quilt several times, but now that I think about it, it is only one of two patterns for a quilt I have ever used.  

I usually just come up with my own, but never write the directions down.  I get inspiration from all sorts of places and when I think of a quilt I want to make I sit down with excel or graph paper and figure out how I am going to make it.  I cut all the pieces and put them on my design wall, then figure out what order I am going to sew the pieces, what direction I am going to iron my seams and how to assemble the rows.

That being said, here is my first attempt at writing down how I made a quilt!  Please feel free to email or comment with any questions and I will do my best to answer.

Here are a couple of shots of mine quilted:


You will need:

41 5" X 5" Charm Squares (I used Moda Coquette)

100  2" X 5" Rectangles (Mine are white).  This is 3/4 Yard of fabric.

60 2" X 2" Squares of an accent color (Mine are yellow).  This is less than 1/4 yard. 

8 6 1/2" X 6 1/2" Squares for the sides of blanket or end of rows (Mine are white.  Yours need to be the same color as your rectangles).  This is less than a 1/4 yard.

1 7 1/4" Square for corners.  This is less than 1/8 yard.

This quilt is assembled on the diagonal and I worked from bottom right corner to top left corner.  This is certainly not the last word on how to assemble this quilt, this is just my method of doing it.

Each odd numbered row begins and ends with a 2" X 2" Square and each even numbered row begins and ends with a 2" X 5" Rectangle.

Row #1 - 2 Squares / 1 Rectangle
Row #2 - 2 Rectangles / 1 Charm Square
Row #3 - 4 Squares / 3 Rectangles
Row #4 - 4 Rectangles / 3 Charm Squares
Row #5 - 6 Squares / 5 Rectangles
Row #6 - 6 Rectangles / 5 Charm Squares
Row #7 - 8 Squares / 7 Rectangles
Row #8 - 8 Rectangles / 7 Charm Squares

Row #9 - 10 Squares / 9 Rectangles
Row #10 - 10 Rectangles / 9 Charm Squares
Row #11 - 10 Squares / 9 Rectangles
(Rows 9-11 are "segmented" from the other rows for a reason.  Explanation coming up!)

Row #12 - 8 Rectangles / 7 Charm Squares
Row #13 - 8 Squares / 7 Rectangles
Row #14 -  6 Rectangles / 5 Charm Squares
Row #15 - 6 Squares / 5 Rectangles
Row #16 - 4 Rectangles / 3 Charm Squares
Row #17 - 4 Squares / 3 Rectangles
Row #18 - 2 Rectangles / 1 Charm Square
Row #19 - 2 Squares / 1 Rectangle

Assemble each row ironing seams to the dark on each row.  On even rows, this means you will iron your seams toward your 2" X 2" Squares and on odd rows you will iron your seams toward your Charm Squares.

Next, assemble the rows in this order:

Rows #1 & #2
Rows #3 & #4
Rows #5 & #6
Rows #7 & #8

Rows #9, #10 & #11

Rows #12 & #13
Rows #14 & #15
Rows #16 & #17
Rows #18 & #19

Iron your seams toward the Charm Squares on each row.  Now, I actually ironed mine toward the rectangles and small squares, so please, Quilt Police....don't come get me!  It really should have been ironed toward the Charm Squares, but some things can only be seen in hindsight!


So, you should end up with 9 rows total.  

Now that you have those assembled, cut your 6 1/2" squares corner to corner.  These will be sewn to the end of 8 of your rows to complete your strip.  The longest side of each triangle should face out.  I find it easy to get confused on these and would suggest you lay it out so that you can get your mind clear on which edge you are sewing to your strip.

Sew one triangle to each end of rows:

#1 & #2
#3 & #4
#5 & #6
#7 & #8

#12 & #13
#14 & #15
#16 & #17
#18 & #19

Do not sew these onto your row that is made up of strips #9, #10 & #11!

Now that you have your rows complete, sew each together in any order you like.  I assembled each half first and then attached each half to my large center strip (#9, #10 & #11).  

Now cut your 7 1/4" Square from corner to corner and again from corner to corner on the opposite corner.  You will have 4 small triangles.  Sew each triangle onto each corner.  There is not much room for error with these measurements so I suggest pinning so your corners don't slip on you!

And, wha-la, you are finished.

This quilt measures 42" X 42" finished.  You could certainly add a border to make it larger, but I liked the absence of a border.  Quilt however you like.  I love the simplicity of the straight lines on mine, but I think this quilt would be beautiful stippled as well.

There are a few pictures of this quilt in varying stages on this blog, so I would suggest using them for reference.  I take a photo of it on my design wall and have to use it often when making a quilt.  


Sunday, October 7, 2012

Flower Basket Quilt

I did a post a little bit back about my design wall.  When I did that post I had thrown up some charm squares I had just gotten on it.  I could already see that it was going to be a beautiful quilt, and now that it is all laid out on my design wall, I am even more excited about it!  I am calling this quilt "Flower Basket" and it will be available on my Etsy shop when it is finished.  The pattern will also be available here on this blog when it is done.

I say this every quilt I make, but this is my favorite quilt so far!  It just screams spring and little girl!