Saturday, September 29, 2012

Design Wall Heaven

I am super excited about my latest quilt project.  Granted, it is about 4 projects down the line from now.  But....when I threw these charm squares up on my design wall, I knew this was going to be a beautiful quilt.


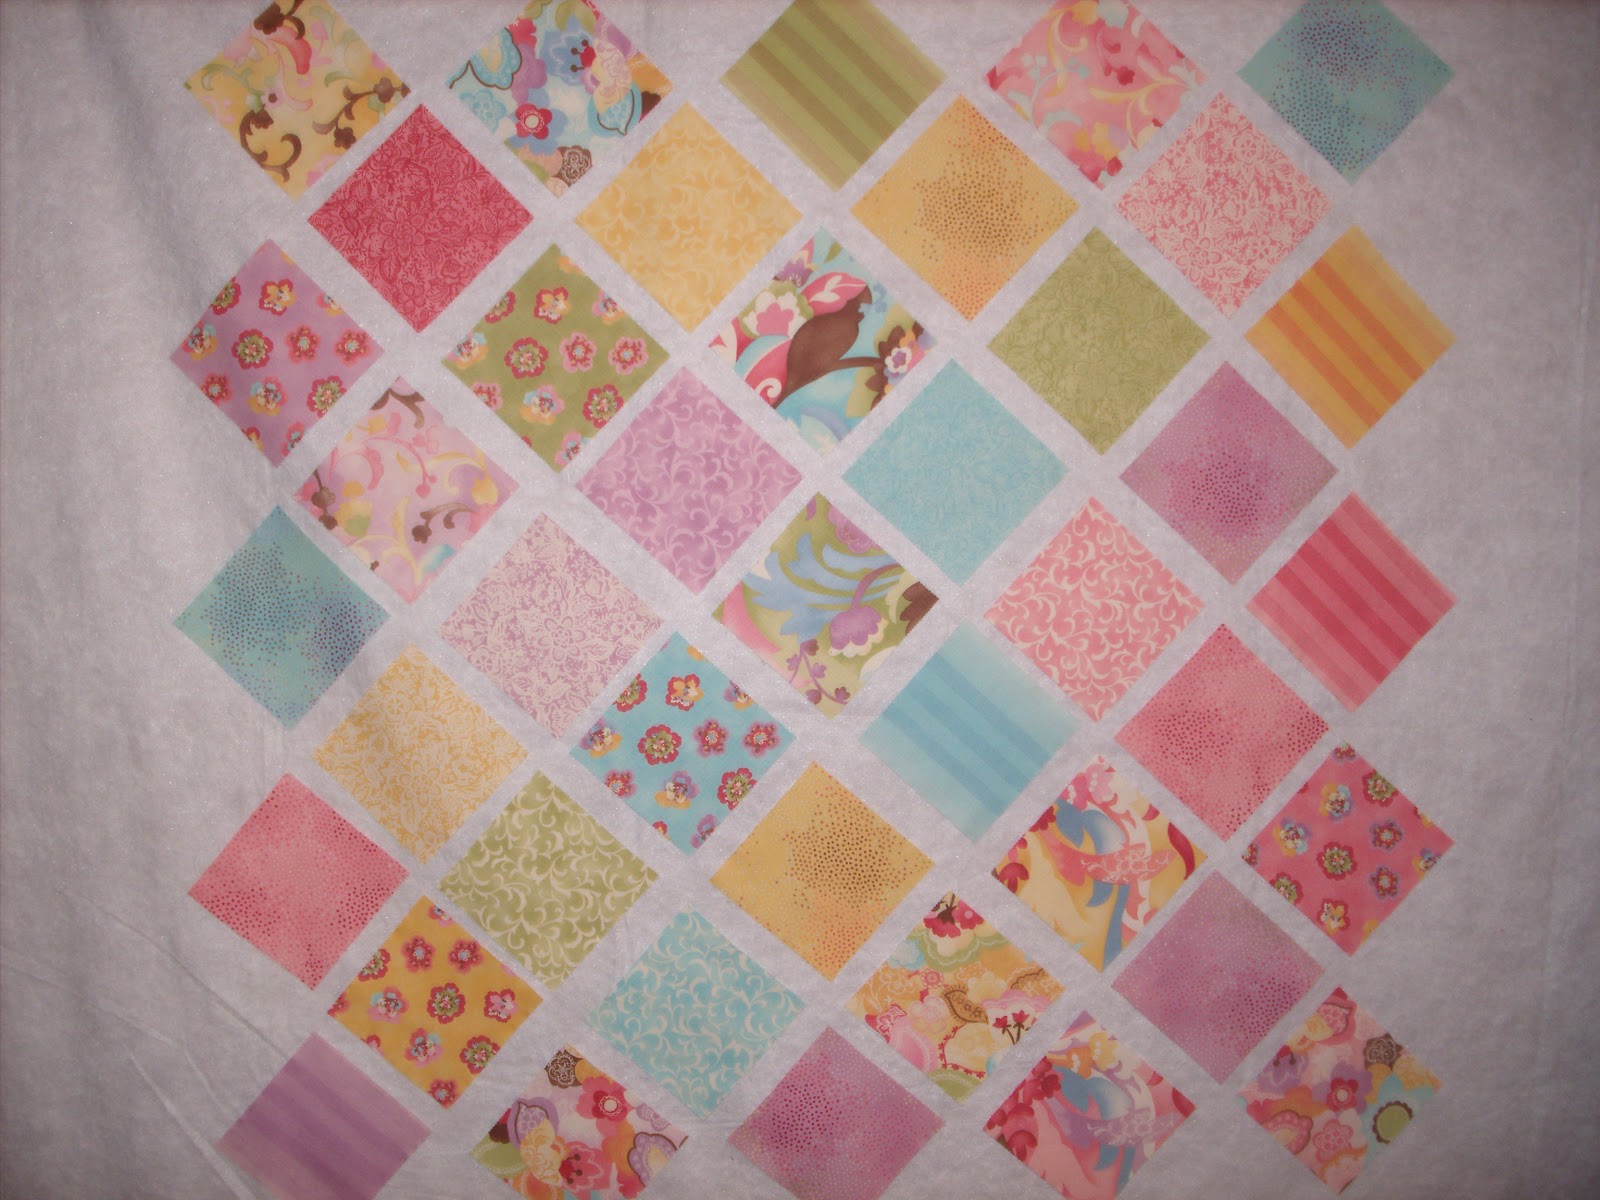
Now, it's really too early to talk about the quilt (but the pattern will be available in the future when I complete this quilt), but I'm really posting to talk about my design wall.

This was, by far, the BEST few bucks I ever invested in my quilting room!  I always thought I could not afford a design wall, until I stumbled upon this idea online.  It works like a charm and is super cheap to make.  I LOVE having the freedom to arrange all my pieces, and rearrange them, and rearrange them some more until I love my design.  I also love that I can walk away from it for a day or two without it taking up space on my table or floor.

This design wall is made of:

1 Large Tablecloth from Wal - Mart.  Get an inexpensive one that is plastic on one side and sort of fuzzy/felt on the other side.

4 Command Strip Hooks

4 Curtain Rings with Hooks.  I got mine at Wal-Mart.  They are small rings with a clip built on so you just clip them right on where you want to.

That is it.  My fabulous other half measured and leveled for me so I knew how to evenly space out my Command Hooks.  I did have to trim and hem the end of my tablecloth a bit so that it did not drag on the floor.

You literally just press your fabric against the cloth and it stays where you put it!

If you don't have a design wall, or think you can't afford one, I highly recommend this cheap solution.  It has worked wonders for me! 

Sunday, September 23, 2012

Flannel, flannel.....and more flannel!

Today has been another one of those Sundays where I feel like the walls are closing in on me because I have 1,000 things I want to get done before the new work week that is just mere hours away!

Guess I shouldn't have spent all day yesterday yard sale shopping, going to the movies and grocery shopping!

After a frantic morning of trying to get my housework done and my meals planned and precooked (as far as I can take them) for the week, I decided to squeeze in some time doing what I love before going back to work......quilting.

Some time back, someone commissioned me (for lack of a better term) to make 6 cupcake quilts for their grand daughters.  She had a ton of chocolate brown cupcake fabric and wanted some used in every quilt.  I was down to my last one and it has been 75% finished for quite some time now.  I just have not been "in the mood" to work on it lately.  But, today I decided to step away from my vintage sheets for a few hours and finish up this quilt!


This was the last of the 6 and, as far as I am concerned, a bit of a scrap quilt.  By the time I got to this one, I did not have enough of the focus fabric to do whatever pattern I pleased.  Instead, I had to work with what little I did have and make something that made sense.

I don't have a formal pattern for this quilt as I did not use one, I just sort of winged it!  However, I can tell you that there are:

90 3 1/2" squares (solid green)
90 3 1/2" X 6 1/2" rectangles (various patterns/colors)

You essentially put them together in an alternating pattern and fashion as many rows as you like.  I honestly think this would have looked nice in a group of solids as well.

If you happen to make one, send a picture my way!


Here are some of the other cupcake quilts in the "collection" 

"Argyle"

"Chocolate Hopscotch"

"Zig Zag"

"Neapolitan"

This one was for a baby and I made the executive decision not to use the chocolate cupcake fabric and opt for a pastel one instead.  

Sunday, September 16, 2012

Vintage Project Update

Well, here are some photos of the Vintage Sheet Quilt in various stages.  This quilt is turning out beautifully.  I love the simplicity of the pattern and the colors in it.  The green highlights the pink well!  And, the more rows I put together, the more I love it.


Thursday, September 13, 2012

Vintage Sheet Project

I am always trying to expand my horizons with quilt making.  I have made quite a few quilts but I still consider myself quite the beginner.  I have recently started getting into vintage sheets.  I have found some at yard sales and, recently, a good friend of mine gave me some that were her late mother's.  They were beautiful and the thought of making something out of sheets that were so old really appealed to me.  The idea of making something that someone was about to turn into trash into something that could be treasured just tickles me.

I don't normally go for the flowery, girly patterns....particularly roses.  But, when I saw these sheets, they really spoke to me.  I think it must be the squiggly blue in them that called to me.  It toned down the flower pattern enough for my pallet and it also reminded me of stipple quilting which I think makes a quilt look just yummy and scrunchy.  Now, these came from a yard sale so I can't be sure how old these are or how "vintage" these are.  The blue and pink sheets are definitely old enough to be called vintage, though.

These are not all the fabrics that will be in the quilt, but these are the dominant ones.


And, here is a sneak peek of one row.  It is hardly a reflection of the finished project, but I do like the feel of it so far!  I have dubbed this quilt "Tea Cup Rose Garden".  It will be a beautiful addition to my bedroom when it is finished.  :)


Tuesday, September 11, 2012

Quilt For Kids


Downy has a great program to give quilts to little ones in the hospital.  The program is called Touch of Comfort and you can check it out here.  

You go online, sign up, and they send you a kit with fabric and a pattern.  You assemble the quilt, wash it and ship it back.  I just love this program and had a wonderful time working on this little project over the weekend.

The programs website says that they have collected more than 20,000 quilts for sick children through this program!  If you are a quilter, you should really consider participating.  This quilt is small and easy and could be made in one or two days by an experienced quilter.  It is also easy enough that a beginner could assemble it as well.

Here are some shots of mine:


Monday, September 3, 2012

Daisy Wheel Crochet Washcloth

I just finished up this washcloth for my bathroom. It will be one of several to coordinate with a new shower curtain I got at a yard sale.  

I stumbled across this pattern online over a year ago.  I loved it!  I printed it off, made one, gave it away then stowed the pattern away in a crate for a rainy day.  When i finally decided to make one for myself....could not for the life of me remember what I did with it.  I thought, "no problem, I will just google it".  Yeah....two days later and zip....zilch.  Finally found it in a bin full of patterns.  My faith in the world was restored!

I worked this one up while watching Breaking Bad on Netflix tonight.  But, I thought maybe I should throw this up on my blog in case 1) someone else may be looking for it and 2) in a year from now, I may decide to make another one and won't know what the heck I did with the pattern!

Happy Hooking!

It is my understanding that this pattern was originally available as a free pattern from Lily that someone picked up from Michaels.....not positive where it originated to be honest.

Instructions:

With 1st color, ch 4.  Join with sl st to form ring.

First round:  Ch 3 (counts as dc).  9 dc in ring.  Join with sl st to top of ch 3.  10 dc.

Second round:  Ch 3 (counts as dc).  1 dc in same sp as sl st.  *2 dc in next dc.  Repeat from * around.  Join next color with sl st to first dc.  20 dc.

Third round:  With 2nd color, ch 3 (count as dc).  1 dc in same sp as sl st.  *2 dc in next dc.  Rep from * around.  Join with sl st to top of ch 3.  40 dc.

Fourth round:  Ch 3 (counts as dc).  1 dc in each of next 2 dc.  2 dc in next dc.  *1 dc in each of next 3 dc.  2 dc in next dc.  Rep from * around.  Join 1st color with sl st to top of ch 3.  50 dc.

Fifth round:  With 1st color, ch 3 (counts as dc).  1 dc in each dc around.  Join with sl st to top of ch 3.

Sixth round:  Ch 3.  1 dc in each of next 3 dc.  2 dc in next dc.  *1 dc in next 4 dc.  2 dc in next dc.  Rep from * around.  Join 2nd color with sl st to top of ch 3.  60 dc.

Seventh round:  With 2nd color, ch 1.  1 sc in same sp as sl st.  * Miss next dc.  8 tr in next dc.  Miss next dc.  1 sc in next dc.  Rep from * to last 3 dc.  Miss next dc.  8 tr in next dc.  Miss last dc.  Join with sl st to first sc.

Fasten off and ta dahhh!